Push Mechanisms
1. Background
This document describes how to set up Push Login infrastructure, using WebADM, OpenOTP Push Server and optionally WAProxy.
OpenOTP is the RCDevs MFA Service running on top of the RCDevs WebADM platform. OpenOTP itself is composed of several server applications and components that provide secure and reliable authentication of users connecting to applications, online services, intranet, extranet just to name a few. OpenOTP relies on proven technologies and open standards, such as OATH (the initiative for open authentication), HOTP / TOTP / OCRA, Radius, LDAP.
WAProxy is an HTTP(S) reverse proxy for WebADM. While any reverse proxy should be able to fill the role, WAProxy is pre-configured to work securely with all the features of WebADM and thereby is recommended. WAProxy handles basic load balancing, failover and both server and client certificate setup with the least possible amount of configuration effort.
Push Server for OpenOTP Token is a service provided by RCDevs. This service is free for RCDevs customers with an Enterprise Licence. Those using a freeware OpenOTP license (limited to 20 users) must create a freeware license to communicate with RCDevs cloud services. Once freeware license is created, you receive an email with a link to download your license.key file which must be located in /opt/webadm/conf/ folder.
For more information about RCDevs OpenOTP, please refer to documents at RCDevs OpenOTP.
For more information about RCDevs WAProxy, please refer to documents at RCDevs WAProxy.
2. Deployment Scenarios
2.1 Applicable for WebADM 1.x versions
Scenario 1

Scenario 2
Scenario 3

2.2 Applicable for WebADM 2.x versions
Scenario 1
Scenario 2
Scenario 3
3. Installation of Required Components
For installation and basic configuration of WebADM, OpenOTP and WAProxy, please refer to manuals available at RCDevs Documentation.
4. Deployment Scenarios Described
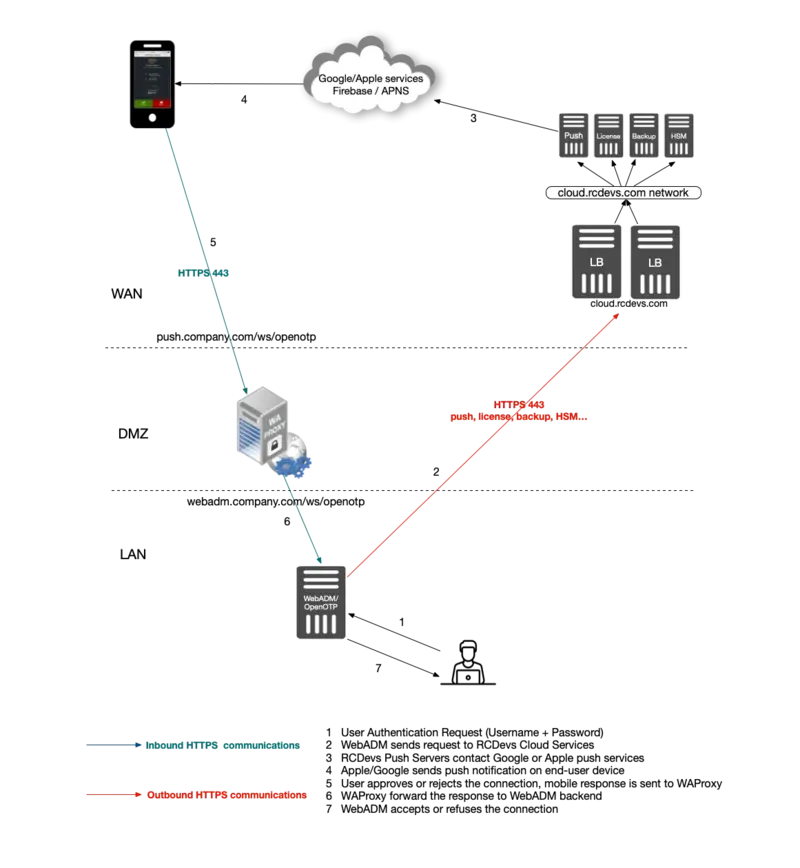
Scenario 1: This scenario includes RCDevs WAProxy on DMZ, avoiding WebADM/OpenOTP servers to be exposed on the Internet. This setup is recommended as being the most secure of the three options.
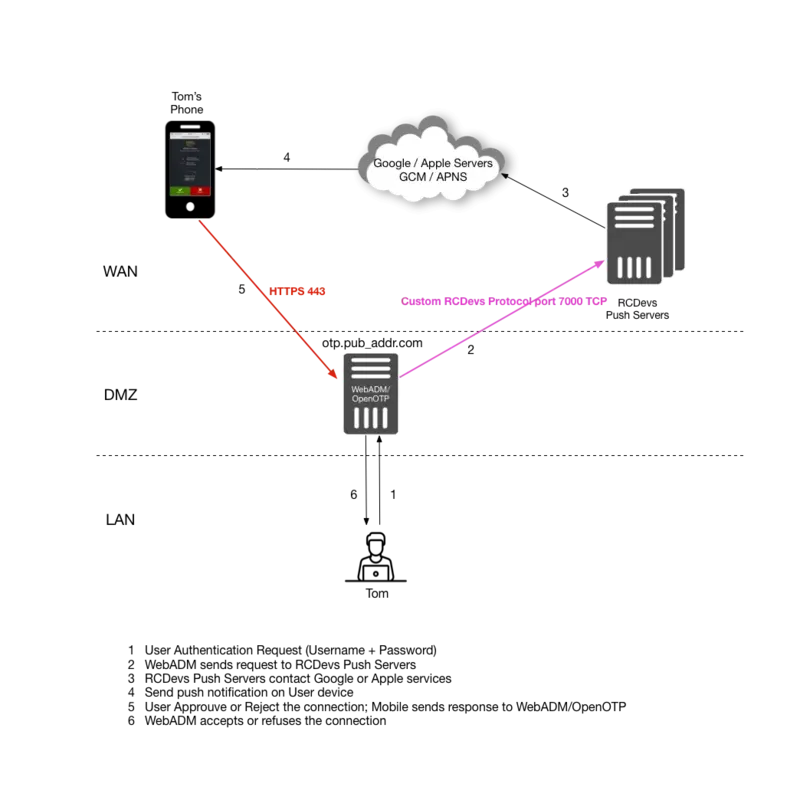
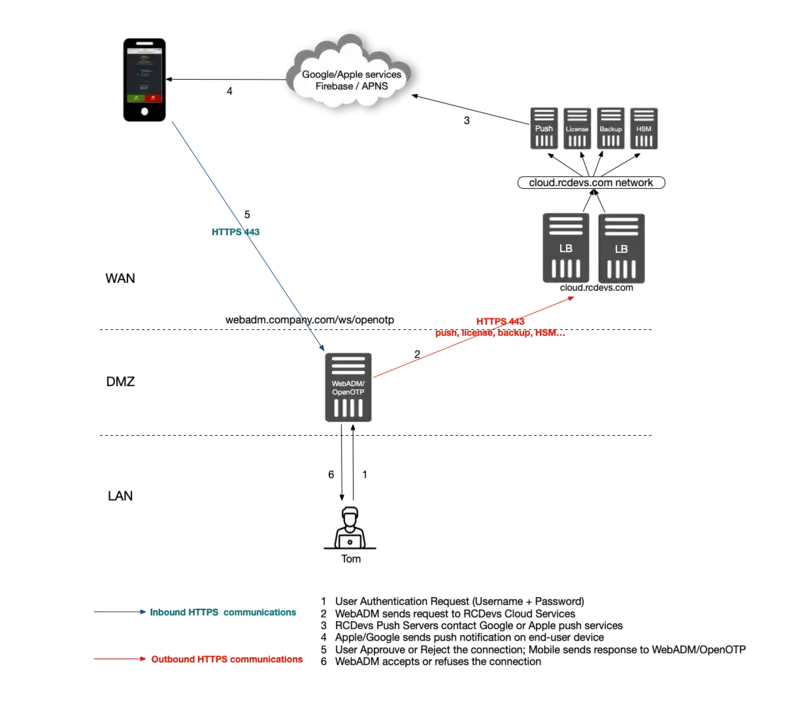
Scenario 2: This is a relatively simple setup with no reverse proxy at all. WebADM/OpenOTP are exposed to the Internet and communicate directly with Push Servers and with end-users’s mobiles. This scenario is recommended for testing purposes.
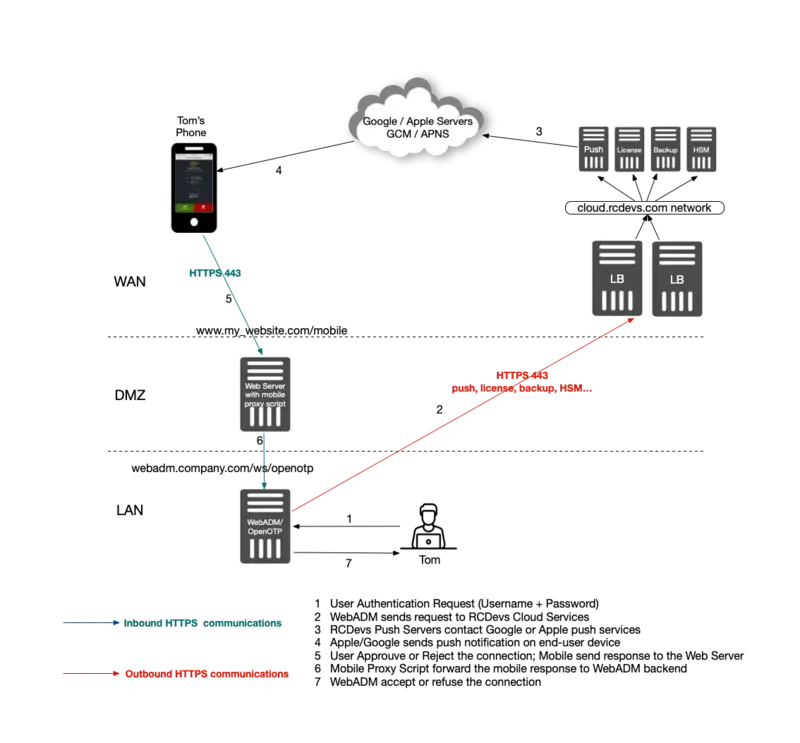
Scenario 3: This scenario is similar to Scenario 1, however with the possibility of using an existing Internet-facing Web server as web reverse proxy, rather than WAProxy. You can install RCDevs sample proxy script on your existing web server and this script will act as a reverse proxy as to your WebADM/OpenOTP servers.
The RCDevs sample proxy script can be found on your WebADM installation.
/opt/webadm/websrvs/openotp/doc/token_proxy.php
Note
Please note that your web server have to support PHP and CURL.
5. Scenario 1: WebADM Configuration & WAProxy
This chapter describes the configuration of Scenario 1. The chapter assumes you have a working WAProxy already in place. If you do not have WAProxy yet set up, please refer to WAProxy installation and configuration manuals
Once your WAProxy is ready, go to your WebADM server to set up the communication to work between your WebADM and WAProxy.
Edit the file /opt/webadm/conf/webadm.conf.
Find the section with WAProxy configuration and edit it:
# Private WAProxy IP who will contact the WebADM server
waproxy_proxies "192.168.3.150"

# The public DNS name of your WAProxy server
waproxy_pubaddr "wa.yorcdevs.com"
After editing webadm.conf file, restart WebADM services:
service webadm restart
After that, log in on WebADM GUI as Administrator.
Now, for each application available in WebADM, you should see a new option named Proxy WebSrv which appears in the products configuration pages.
When this option is activated for a given application, the application will then become available and accessible through your public WAProxy.
For example, to publish WebADM Self-Desk application:
Go to Self-Desk configuration settings and enable WAProxy WebApp as depicted in the picture below.
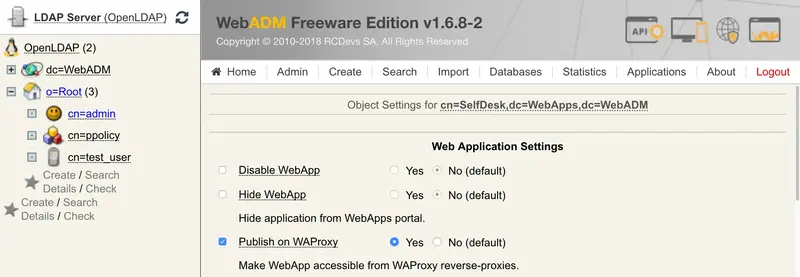
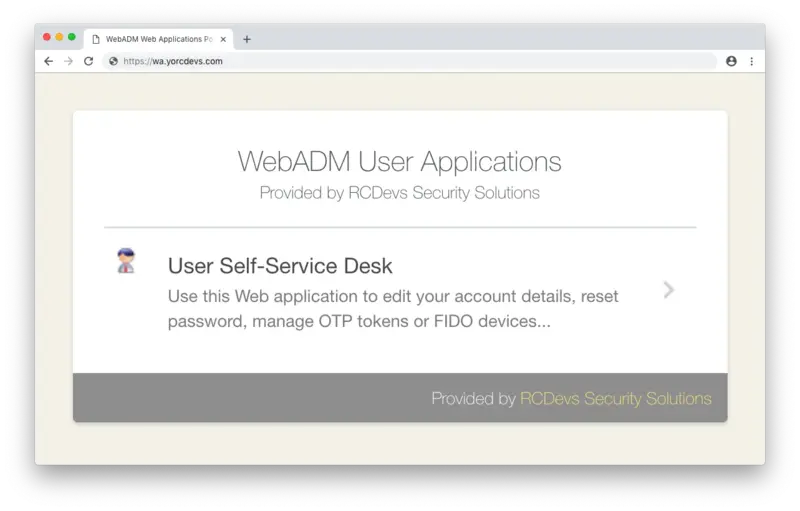
Save changes. Go to your WAProxy server URL and you should see your Self-Desk there published.
6. Scenario 2: WebADM/OpenOTP in DMZ
If your WebADM/OpenOTP servers are already exposed on the internet, or if you simply like to test Push Login, then you do not need to deploy a WAProxy server or the RCDevs Mobile Proxy Script. The URL your phone will contact upon receiving a push notification will simply be the URL of your WebADM/OpenOTP server(s). So there are no configurations needed for this scenario. However, note that the Mobile URL Endpoint setting in Chapter 8 must be configured as follows:
https://webadm.yorcdevs.com/ws/openotp/
Where webadm.yorcdevs.com is a public URL of your WebADM server accessible from the Internet.
7. Scenario 3: Mobile Proxy Script
The mobile proxy script must be used when your WebADM/OpenOTP servers are not exposed on the Internet and when WAProxy is not used. This sample PHP script must be placed on a web server already exposed on the Internet.
Configure your Apache, or similar web platform capable of supporting PHP, deploy the proxy script and define the URL that will be called by the mobile in the OpenOTP configuration.
Example
Important
You must change the default start pages of your WebServer to “token_proxy.php”. Or you must simply rename “token_proxy.php” to “index.php” if “index.php” is one of your default start pages.
Edit the Mobile Proxy Script and configure your WebADM/OpenOTP backends servers:
### My 1st WebADM Server
$endpoint_url = "https://192.168.3.54/ws/openotp/"

### My 2nd WebADM Server
$failover_url = "https://192.168.3.55/ws/openotp/"
These are the URLs to which your Web server and Mobile Proxy Script will forward the mobile response to, the same manner as WAProxy would.
8. OpenOTP Configuration & Push Servers
This chapter describes how to configure WebADM/OpenOTP to connect with RCDevs Push Servers.
Please note that Push server option is only available since WebADM 1.5.3.
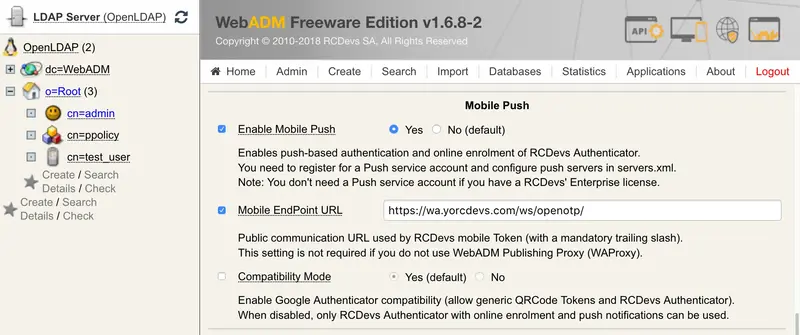
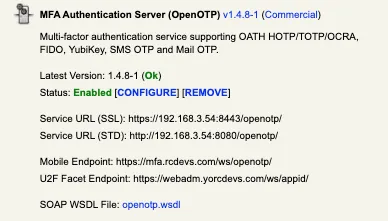
To configure OpenOTP with Push Server, you need to go to WebADM web interface and select Application tab, under which you should select the CONFIGURE link under MFA Authentication Server.
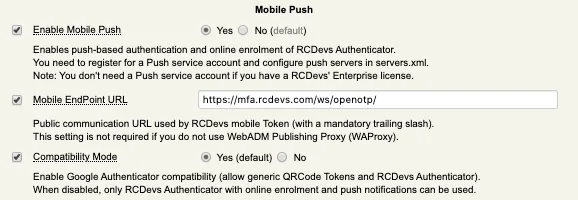
On the following page go to Mobile Push section, where you can enable Mobile Push and configure the Mobile EndPoint URL. This is the URL contacted by mobile and thereby must be accessible from the internet.
Note
The /ws/openotp/ at the end of the URL is default for WAProxy (scenario 1).

Mobile Response Timeout
The Mobile Response Timeout setting can be adjusted if you want to have the push notification available more than 30 seconds on your phone. Be careful with this setting in case you increase it, it will impact all the other timeout like the challenge timeout, or idletimeout on other product. If you are not sure how to configure all other timeout on your clients consuming OpenOTP then keep the default value.
e.g : If you configure the Mobile Response Timeout to 60 seconds, you have to increase the login timeout to 75 seconds on every client or system using OpenOTP.
If you are setting up scenario 2 then set the address of your WebADM server, i.e: https://webadmserver.mycompagny.com/ws/openotp/.
/ws/openotp/ is default URL for WebADM/OpenOTP sitting in DMZ.
If you are setting up scenario 3 then set URL to point to where you installed Mobile Proxy Script.
Example
https://myWebSrvURL/mobile/
8.1 Applicable for WebADM 1.x versions
The last step is to configure the push server location to WebADM. This is done in /opt/webadm/conf/servers.xml.
<PushServer name="Push Server"
	host="push.rcdevs.com"
	port="7000"
	user=""
	password=""
	ca_file="" />
Restart WebADM services to changes takes effect.
Note
Customers with RCDevs Enterprise Licence will not need to set user & password.
push.rcdevs.com is a DNS name for redundant infrastructure. The actual resolved IP for push.rcdevs.com can change, so it is recommended to use the DNS name instead of the IP.
8.2 Applicable for WebADM 2.x versions
The last step is to enable RCDevs cloud services in /opt/webadm/conf/webadm.conf.
cloud_service yes
Your WebADM server(s) must be able to reach https://cloud.rcdevs.com
[root@webadm1 ~]# telnet cloud.rcdevs.com 443
Trying 149.202.186.103...
Connected to cloud.rcdevs.com.
Escape character is '^]'.
Have a look on RCDevs Cloud Service documentation for more information.
9. OpenOTP Token Enrolment with User Self-Services
At this point your configuration is complete, and you are ready to start enrolling OpenOTP Token. This chapter describes enrolling OpenOTP Token from the User Self-Service Desk application, available on your WebADM server.
OpenOTP Token is currently available on App Store for iPhone and on Google Play for Android.
Here we describe the User Self-Service Desk accessed through a WAProxy (Scenario 1). The methodology is, however, the same for all three scenarios.
Note
Also, note that user enrolment can be run directly through the WebADM administrator interface.
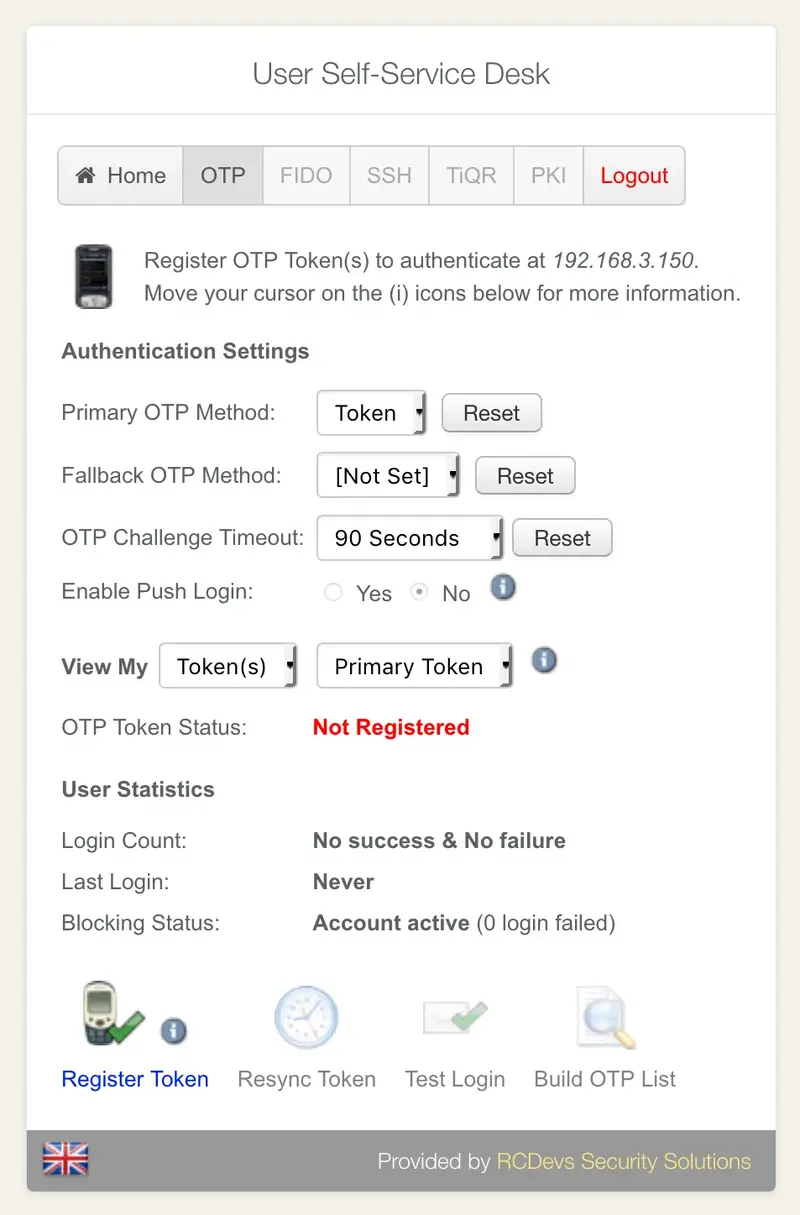
Logon in to User Self-Service Desk:
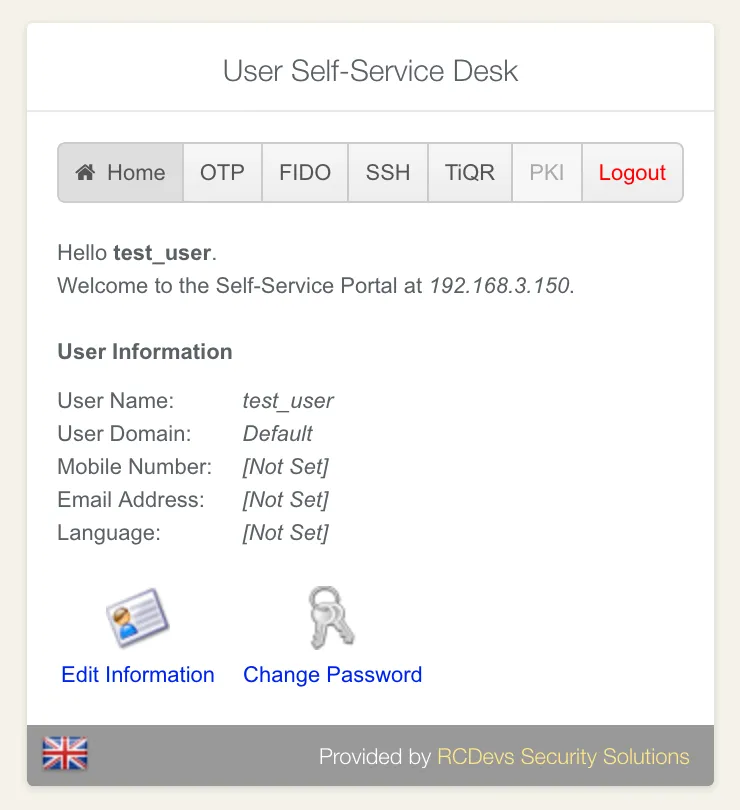
Once inside, click on OTP application menu and Register Token:
Choose the option QRCode-based. You can then choose between time-based or event-based.
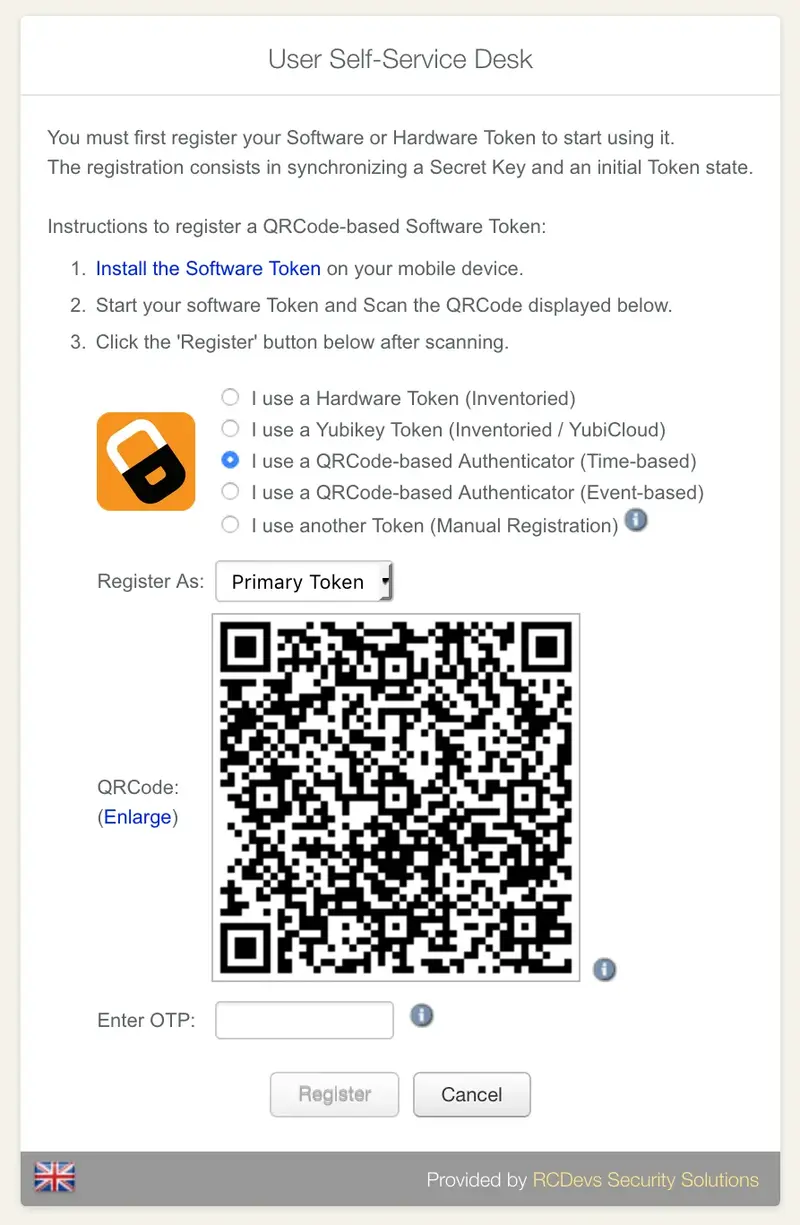
Always prefer time-based if you are unsure which to choose. Open the OpenOTP Token mobile application, scan the QRCode.
Important
You must be connected to the Internet with your smartphone to enroll your OpenOTP Token.
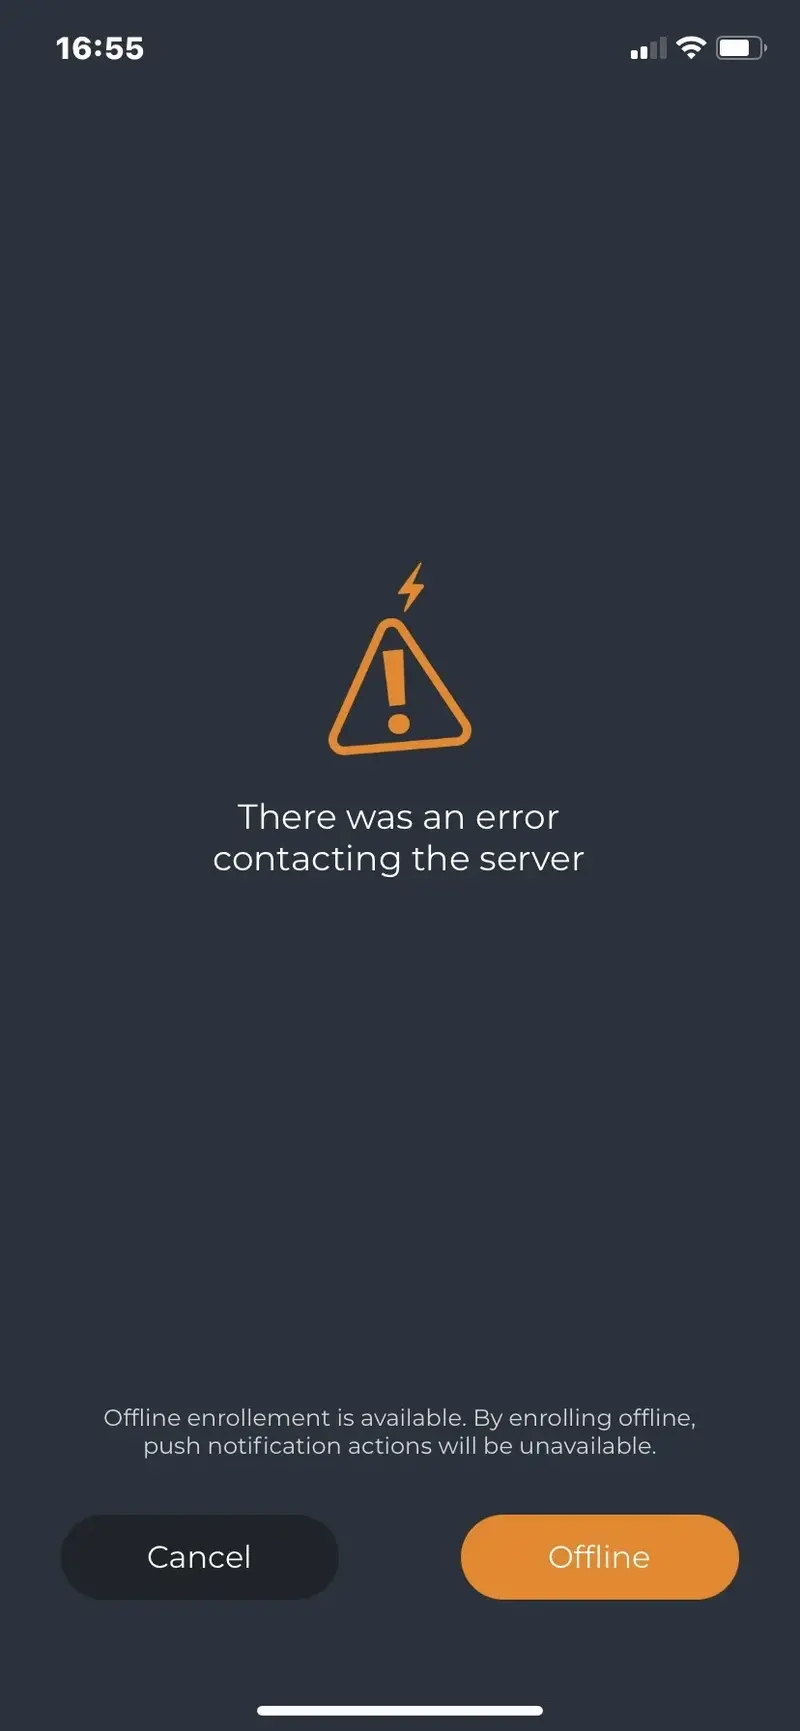
Alert
If you end up with a screen like below, it’s probably because your smartphone cannot communicate with the configured Mobile End Point URL (configured in chapter 8). Check both your mobile internet connectivity and Mobile End Point URL.
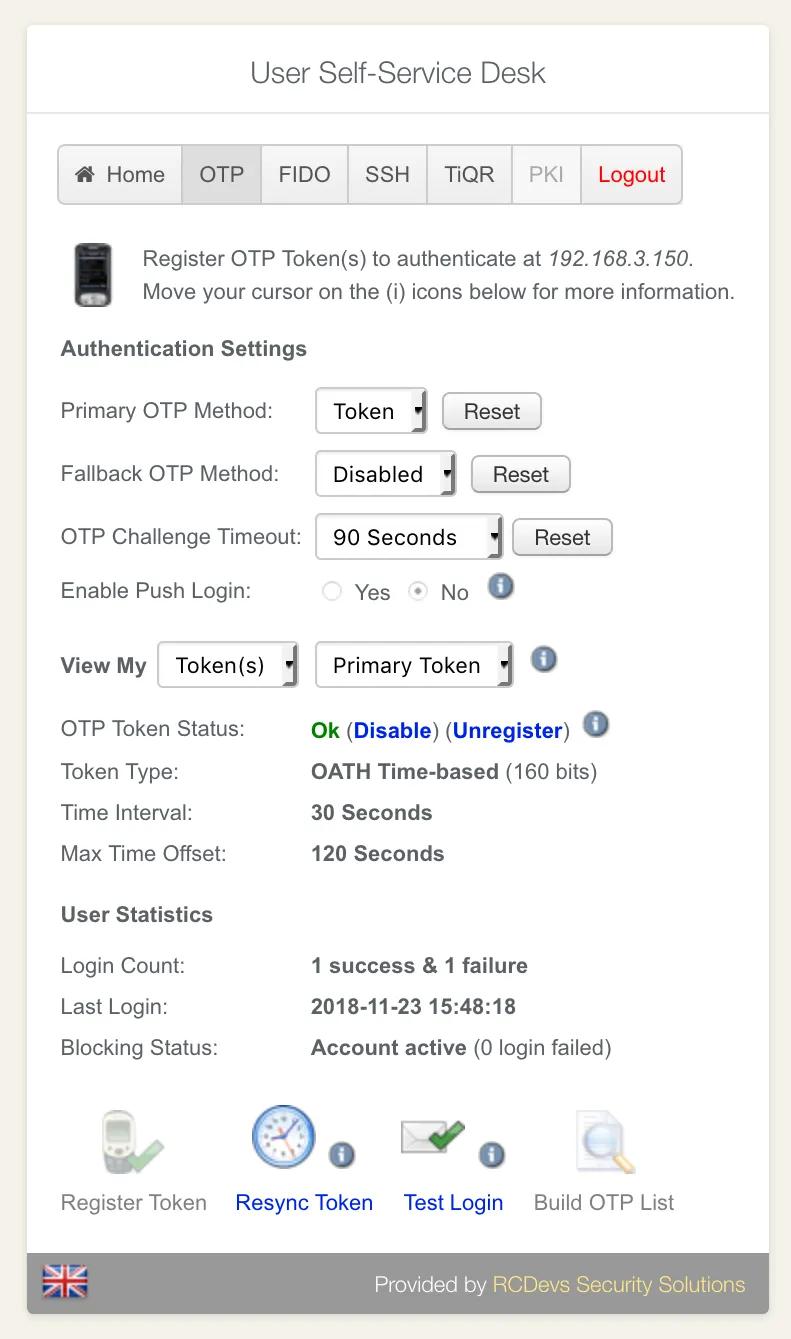
Otherwise, your OpenOTP Token will be automatically enrolled and ready for use! You should also see your Token enrolled within the User Self-Service Desk.
10. Enforcing Simple-Push Login & Testing
You can enforce simple-push login (one-tap access with approve/reject) for one single user, for a group of users, for all your users, or for a given application/device (see WebADM Client Policies). In this example, we enable simple-push login for a one individual user.
Go to WebADM GUI interface and click on the user that you like to configure for push notification. In object details, click on CONFIGURE WebADM Settings, then choose the OpenOTP Application.
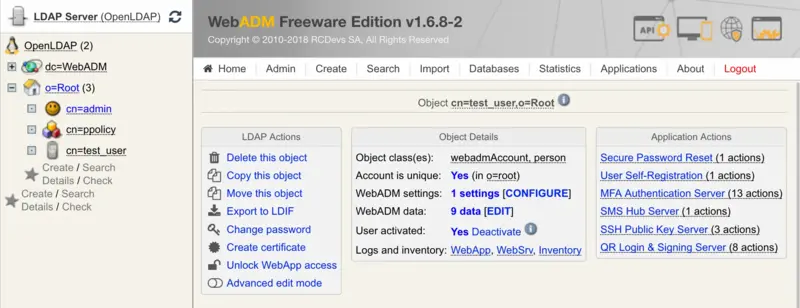
Find the Token Features section (like in the picture below). Enable Simple-Push Login.
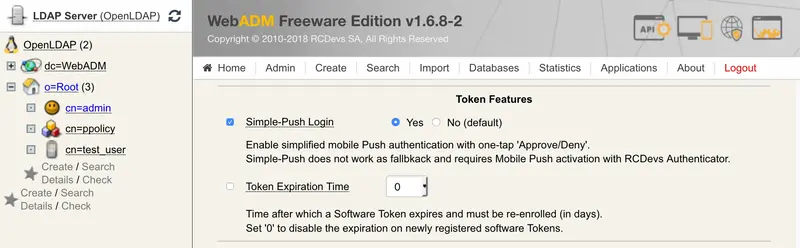
Save changes and go back to the User Self-Service Desk to test the push login.
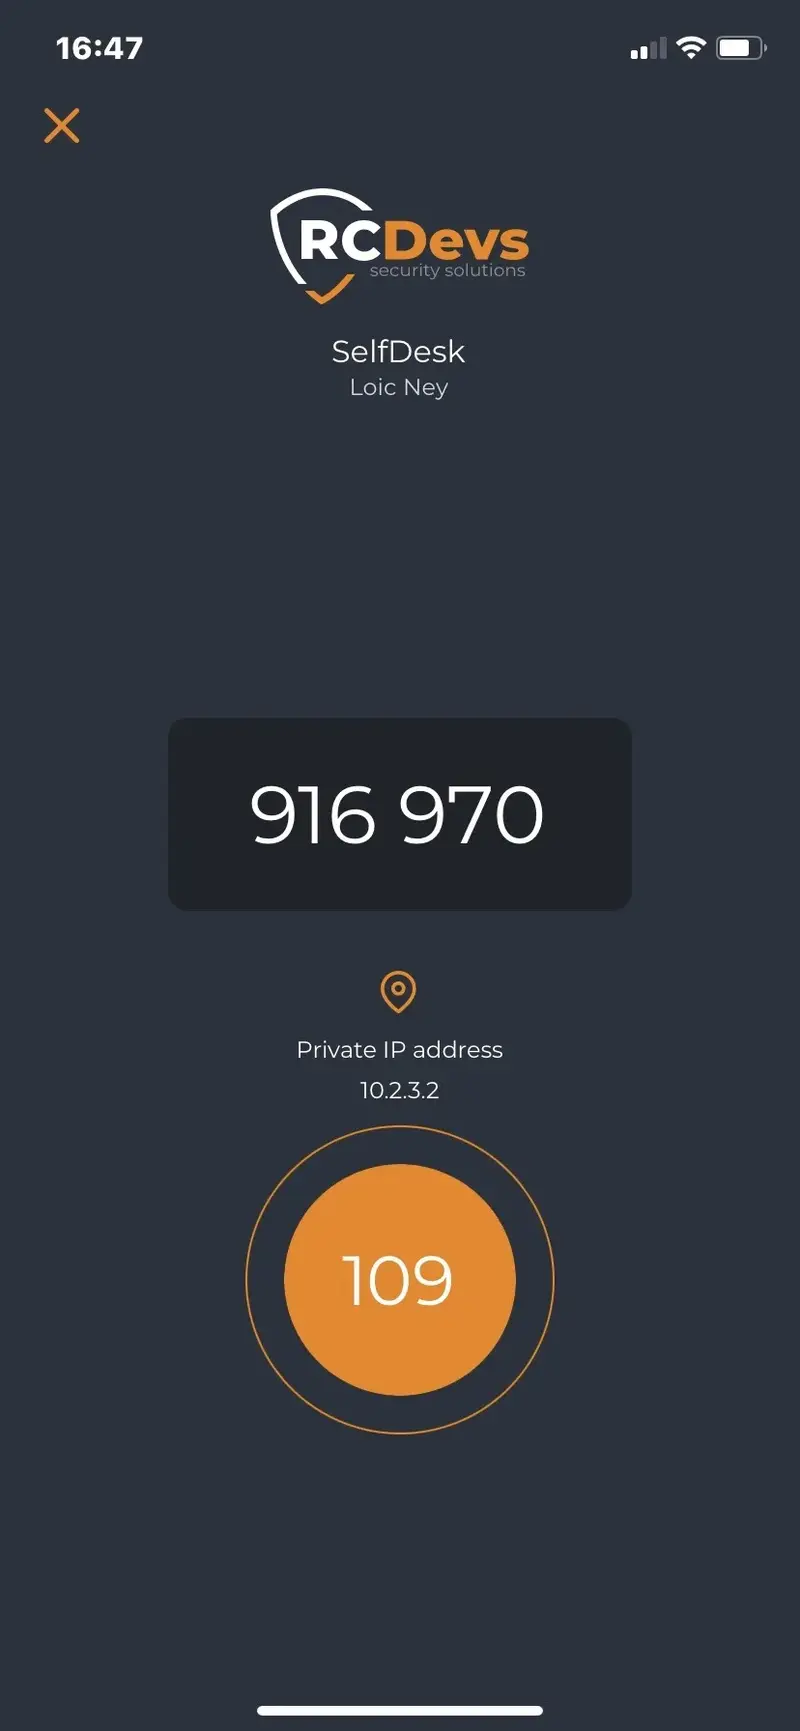
In User Self-Service, choose Test Login. A push notification should appear in your Smartphone, similar to picture below:
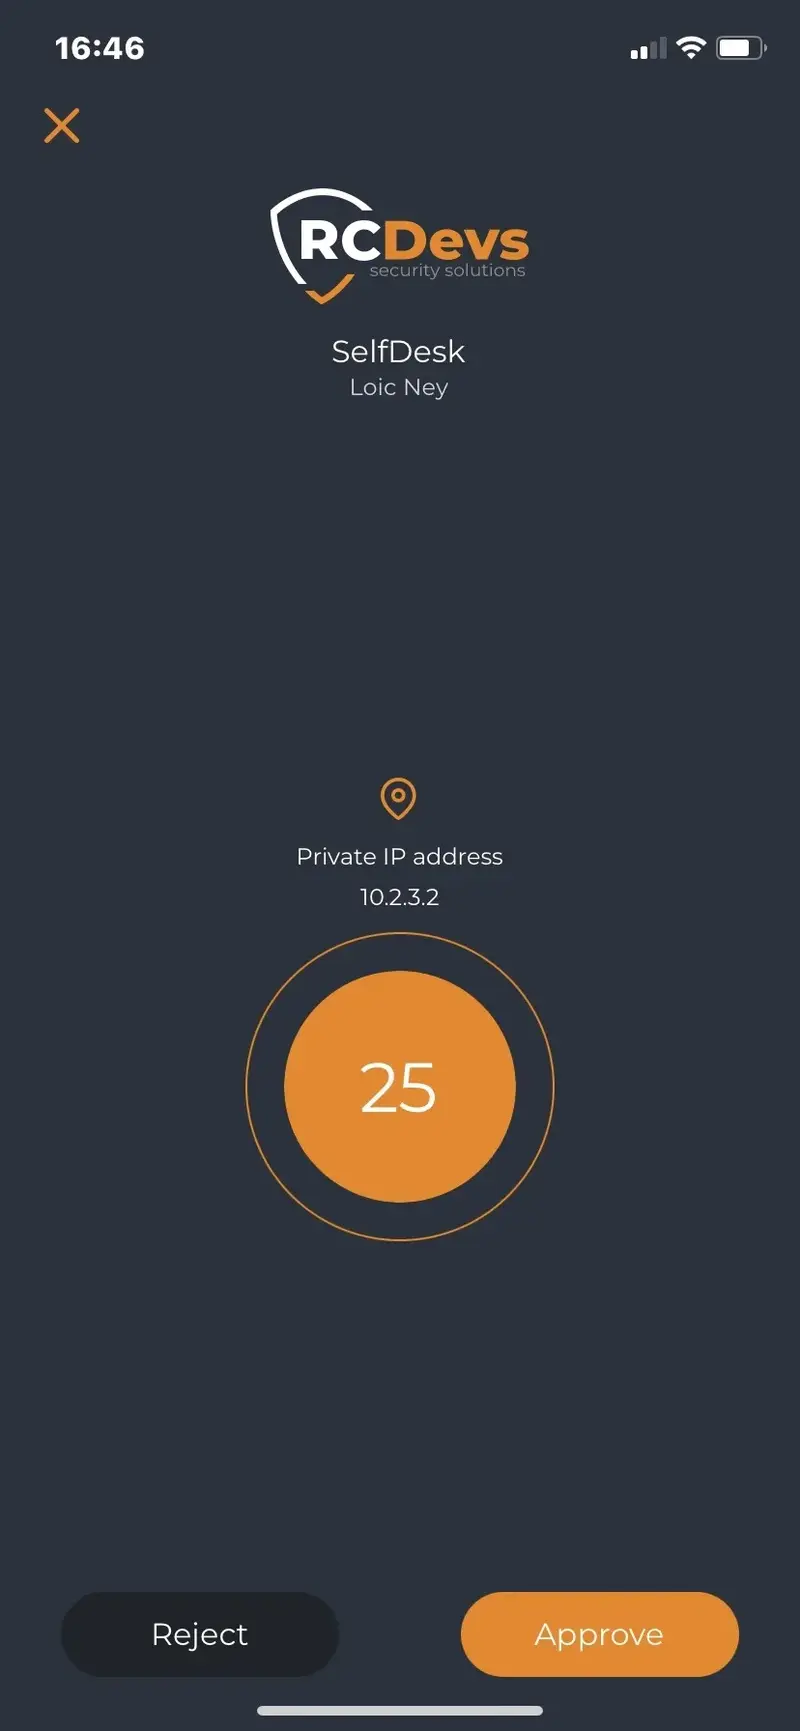
Click on Approve and authentication should complete successfully!
11. OTP Types and NoWaitState flag
Receiving a push message requires the mobile to have a network connection. In case the mobile for some reason cannot receive the push message, OpenOTP implements a mechanism to bypass the wait for the simple push timeout.
11.1 Normal Time or Event based OTPs
The regular OTPs displayed when your OpenOTP Token application is open are based on time or event counter. When an authentication is attempted with simple approve/reject workflow the OpenOTP server waits for a configured time for a response from a mobile. If there is no response, the user is asked for an OTP. If they provide the regular displayed OTP, then the NoWaitState flag is added to the user account.
When that flag is present on users account, the simple push approve/reject is temporary disabled and for the next user login, the user will receive a displayed OTP push. If the user authenticate with the displayed OTP push, then the NoWaitState flag is removed and the simple push is re-enabled.
11.2 Simple Push (Approve/Reject)
This is a simple push. This kind of push is received when the NoWaitState flag is NOT set on the user account.

11.3 Displayed push
The displayed push is sent when the NoWaitState flag is present on the user account.
That allow OpenOTP server to send a challenge request to the client system to allow the user to enter the 6 digits OTP without waiting for the simple push timeout.
If a user successfully authenticates with displayed push OTP, it means the user’s phone is receiving push notifications and the NoWaitState flag can be removed from user’s account, re-enabling simple approve/reject push for that user.
12. Use an existing Reverse Proxy instead of WAProxy
Many other solutions, such as web application firewalls, load balancers or reverse proxies can also be used for forwarding the mobile push requests (or web applications) to WebADM, replacing WAProxy component.
In this chapter we explain the requirements for this only from WebADM perspective. Please refer to the documentation of the solution you are using for further details.
The Mobile endpoint URL configured in OpenOTP must point to the public interface for your front-end device:
Push responses from mobiles will then arrive at https://mfa.rcdevs.com/ws/openotp/ and must be forwarded to https://webadm_backend/ws/openotp/ by your existing front-end component.
The IP address of the front-end device used to forward requests to WebADM servers must be configured in /opt/webadm/conf/webadm.conf in order to be accepted by WebADM. This is the IP which is visible to WebADM, typically an internal IP and not the external IP.
# If your WebADM server is used behind a reverse-proxy or load-balancer, you need to
# set the IP address(es) of your reverse-proxy server(s). Your proxy MUST create the
# HTTP_X_FORWARDED_FOR and HTTP_X_FORWARDED_HOST headers.

reverse_proxies "192.168.0.100", "192.168.0.101"
Please also note above the requirement for HTTP_X_FORWARDED_FOR and HTTP_X_FORWARDED_HOST headers. There are required to have the end user/client IP visible in WebADM.
Here is a tutorial on how to configure IIS as reverse-proxy
13. Parameters sent in push responses for Web Application Firewall (WAF filtering)
Some customers will use their own equipments to forward mobile push responses to WebADM servers. If you plan to analyze and filter requests according to parameters which are included in the HTTP requests, you need to allow the below parameters in your WAF configuration according to your needs:
Register a Token
When a user try to register a push token, the following parameters are contained in the request sent to the WebADM backend:
ostype
action
pushid
pincode
session
secret
model
serial
clock
Unregister a Token
When a user try to unregister a push token from their phone, the following parameters are contained in the request sent to the WebADM backend:
action
username
domain
password
clock
Push logins
When a user try to log in with push notifications, the following parameters are contained in the request sent to the WebADM backend:
session
action
password
pincode
VOICE Biometric logins
When a user try to log in with VOICE biometric authentication, the following parameters are contained in the request sent to the WebADM backend:
session
action
sample
comment
Signature requests
When a user performed a signature request, the following parameters are contained in the request sent to the WebADM backend:
session
action
password
username
domain
signature
initials
comment
localtime
address
certificate
Push Token resynchronization requests initiated by the mobiles
That feature allows you to resync Push tokens registered on phones. The token resync feature covers the following items:
- Token secret key rotation,
- Token configuration update when some Token settings are enforced under OpenOTP server configuration,
- Logo update when token logo has been changed on the backend
The methods used for these actions is called “update” and contains the following parameters:
username
domain
password
clock
ostype
pushid
secret
model
serial
Badging requests
The methods used by the mobile for badging feature of OpenOTP is called “check” and contains the following parameters:
username
domain
password
clock
localtime
current
location
User agent
For customers which are also performing filtering on HTTP headers, the following user agent are used:
iOS for version 1.5.17(68)
OpenOTPToken/68
CFNetwork/1485
Darwin/23.1.0
okhttp/4.9.1
com.apple.trustd/3.0
Android for version 1.5.18(62479856)
User-Agent: okhttp/4.9.2
The user agent versions can change according to the openOTP Token application version. To avoid policy change on your WAF regarding user agent versions changes, you can build a regex to omit the user agent versions checks.