Docker deployment
1. Overview
This guide intends to explain how to install and configure WebADM in docker containers.
The following items will be covered:
- Slapd
- MariaDB
- WebADM
- WAProxy
2. Before you start
All steps were tested in CentOS 7/CentOS 8 and docker version 19. But it should work in any system running a modern version of docker.
In this guide, I assume you already have a working docker installation. In case you need help to set up a docker environment, you can check the docker website documentation.
The host machine will have two IPs configured to expose containers to external world.
3. Docker notes
3.1 Bridge Network
In this setup, we will use the user-defined bridge network net-webadm, so that all our internal containers could connect to each other by hostname.
It was created using the command below:
[root@mdcos ~]# docker network create --driver bridge net-webadm
3.2 Persistent storage
Every time we use the ’-v’ parameter, we are creating a persistent storage in the host machine to be mounted into the container. We do that to prevent data loss every time the container needs to be recreated.
In CentOS hosts, by default, they are created under /var/lib/docker/volumes. You can check that by executing one of the commands below:
[root@mdcos ~]# docker volume inspect volume_name
[root@mdcos ~]# docker inspect container_name
3.3 External Network
Some containers may need to be accessed from outside docker network, to expose containers ports we will use the ’-p’ parameter. In my setup, I am using two IPs (in the same interface) to accomplish that.
[root@mdcos ~]# ip address show ens192
2: ens192: <BROADCAST,MULTICAST,UP,LOWER_UP> mtu 1500 qdisc fq_codel state UP group default qlen 1000
    link/ether 00:0c:29:28:38:78 brd ff:ff:ff:ff:ff:ff
    inet 192.168.3.176/24 brd 192.168.3.255 scope global noprefixroute ens192
       valid_lft forever preferred_lft forever
    inet 192.168.3.175/24 brd 192.168.3.255 scope global secondary noprefixroute ens192
       valid_lft forever preferred_lft forever
    inet6 fe80::127a:626d:5b55:cc77/64 scope link noprefixroute
       valid_lft forever preferred_lft forever
4. MariaDB
First, we will download rcdevs/mariadb image from docker repository:
[root@mdcos ~]# docker pull rcdevs/mariadb
After that, we can start the container using that image:
[root@mdcos ~] # docker run -d --name webadm-db \
-e MYSQL_ROOT_PASSWORD=password \
-e MYSQL_DATABASE=webadm \
-e MYSQL_USER=webadm \
-e MYSQL_PASSWORD=webadm \
-v webadm_db:/var/lib/mysql \
--network net-webadm \
rcdevs/mariadb
You can set diferent values for all MYSQL variables, but keep mind you have to adjust it accordingly in WebADM servers.xml file later.
5. Slapd
Similarly, we will download the rcdevs/slapd image from docker repository:
[root@mdcos ~]# docker pull rcdevs/slapd
Then, you can start the slapd container using the following parameters:
[root@mdcos ~]# docker run -d --name slapd \
-v slapd_conf:/opt/slapd/conf \
-v slapd_data:/opt/slapd/data \
--network net-webadm \
rcdevs/slapd
6. WebADM
After slapd and mariadb has been installed, we are ready to install and configure WebADM. Then now, we will download WebADM container image.
[root@mdcos ~]# docker pull rcdevs/webadm
For WebADM, we will need to publish some ports to external access, since the admin page will be hosted there. Additionally, we will need to be able to reach WebADM services.
For WebADM admin page, it will need port 443, port 80 is optional. Port 8443 is required for WebADM services.
In the command below, I’m using the host IP address 192.168.3.175 as an example for external access, please, change it according to your environment.
[root@mdcos ~]# docker run -d --name webadm1 \
-p 192.168.3.175:80:80 \
-p 192.168.3.175:443:443 \
-p 192.168.3.175:8443:8443 \
-v webadm1_conf:/opt/webadm/conf \
-v webadm1_pki:/opt/webadm/pki \
-v webadm1_logs:/opt/webadm/logs \
-v webadm1_temp:/opt/webadm/temp \
--network net-webadm \
rcdevs/webadm
After the container is started, you need to check container’s logs to get the link to generate the license. If you already have an enterprise license, then copy the license.key file in conf/ folder before starting the WebADM container.
[root@mdcos ~]# docker logs webadm1
WebADM license file is missing. Please install an Enterprise or Freeware license file.
If you just upgraded, WebADM v2.0 now requires a license file even in Freeware mode.

Please point your Web browser to the URL below to get your license file.
After generation, WebADM will auto-install your new license and start.

  https://cloud.rcdevs.com/freeware-license/?id=54fd536ce7350fc7
Access the link above to generate the license. After the license is generated, you will see that WebADM installation progress.
Note
If, for any reason, you were not able to generate the license in time, you can upload it later to /opt/webadm/conf folder, then restart WebADM.
If all services did not start correctly, do not worry about it now. We will fix that later.
[root@mdcos ~]# docker logs webadm1

  https://cloud.rcdevs.com/freeware-license/?id=54fd536ce7350fc7

Waiting for license file to be generated................... Ok
Checking libudev dependency... Ok
Checking system architecture... Ok
Checking server configurations... Ok

Found Freeware license (FREE_0123456789ABCDEF)
Licensed by RCDevs Security SA to Foo Bar
Licensed product(s): OpenOTP,SpanKey

Starting WebADM PKI service... Ok
Starting WebADM Session service... Ok
Starting WebADM Watchd service... Ok
Starting WebADM HTTP service... Ok

Checking server connections...
Connected LDAP server: ERROR (no server available)
Connected SQL server: ERROR (no server available)
Connected PKI server: PKI Server (127.0.0.1)
Connected Session server: Session Server1 (172.19.0.5)
7. WAProxy
This step is optional, but recommended. WAProxy enables you to expose WebADM services for general use without needing to expose WebADM server itself. To find out more about WAProxy, please, check this WAProxy article.
Downloading the WAProxy container image.
[root@mdcos ~]# docker pull rcdevs/waproxy
For WAProxy, we will need to expose the port 443 and 80 to external access. In that example, I am using the host IP 192.168.3.176. Please, change it according to your environment.
[root@mdcos ~]# docker run -d --name waproxy \
-v waproxy_conf:/opt/waproxy/conf \
-p 192.168.3.176:80:80 \
-p 192.168.3.176:443:443 \
--network net-webadm \
rcdevs/waproxy
8. WebADM configuration
Now, we can start WebADM basic configuration using RCDevs Directory as LDAP source.
If you want to set up another LDAP source (AD for example) or more complex scenarios, you can refer to WebADM guides in the following links:
From the host, edit webadm.conf file. In this example, it is mapped to /var/lib/docker/volumes/webadm1_conf/_data/webadm.conf
[root@mdcos ~]# vi /var/lib/docker/volumes/openotp_webadm1_conf/_data/webadm.conf
Set the default proxy_user and password like below.
proxy_user     "cn=admin,o=root"
proxy_password "password"
After that, we need to configure the SQL database and LDAP server IP, so that WebADM will connect to them. For that, we will edit /var/lib/docker/volumes/webadm1_conf/_data/servers.xml
Change the parameter host in LDAP, SQL and Session Server sections. Since our docker containers are in the same bridge network, we can set the LDAP and SQL DB to the container hostname.
For the Session Server, we can set it to localhost.
In my example, I also set LDAP encryption to TLS.
<Servers>
        <LdapServer name="LDAP Server1"
                host="slapd"
                port="389"
                encryption="TLS"
                ca_file="" />

        <SqlServer name="SQL Server1"
                type="mariadb"
                host="webadm-db"
                user="webadm"
                password="webadm"
                database="webadm"
                encryption="NONE" />

        <SessionServer name="Session Server1"
                host="localhost"
                port="4000"
                secret="" />

        <PkiServer name="PKI Server"
                host="localhost"
                port="5000"
                secret="secret"
                ca_file="" />

        <LicenseServer name="License Server"
                host="license.rcdevs.com"
                port="7001"
                ca_file="" />
</Servers>
Then, restart WebADM docker container to apply the configurations.
[root@mdcos ~]# docker restart webadm1
Check WebADM container logs to make sure all connections are OK.
[root@mdcos ~]# docker logs webadm1

Starting WebADM PKI service... Ok
Starting WebADM Session service... Ok
Starting WebADM Watchd service... Ok
Starting WebADM HTTP service... Ok

Checking server connections...
Connected LDAP server: LDAP Server1 (172.19.0.3)
Connected SQL server: SQL Server1 (172.19.0.2)
Connected PKI server: PKI Server (127.0.0.1)
Connected Session server: Session Server1 (127.0.0.1)

Checking LDAP proxy user access... Ok
Checking SQL database access... Ok
Checking PKI service access... Ok
Checking Cloud service access... Ok
Docker mode enable. Waiting for signal to exit...
If everything worked correctly, we are ready to log in WebADM now.
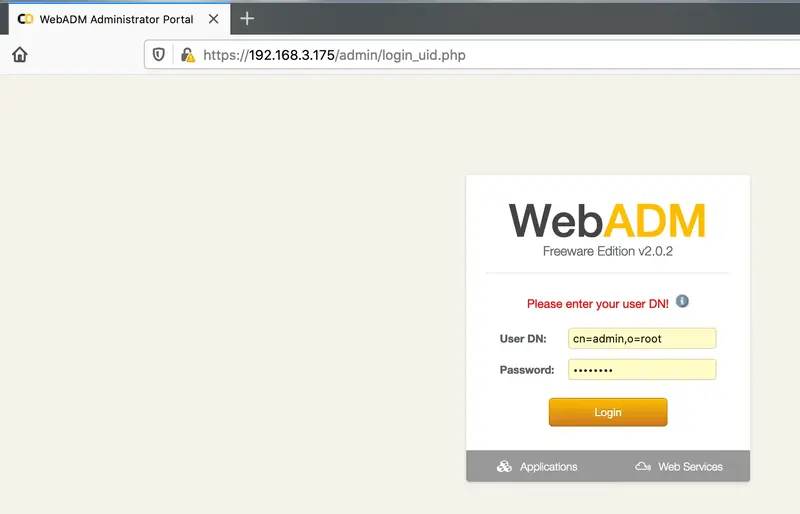
In the first login, you need to enter the full user DN and the default password.
- User: cn=admin,o=root
- Pass: password
Go to https://your_webadm_ip, then enter your credentials.
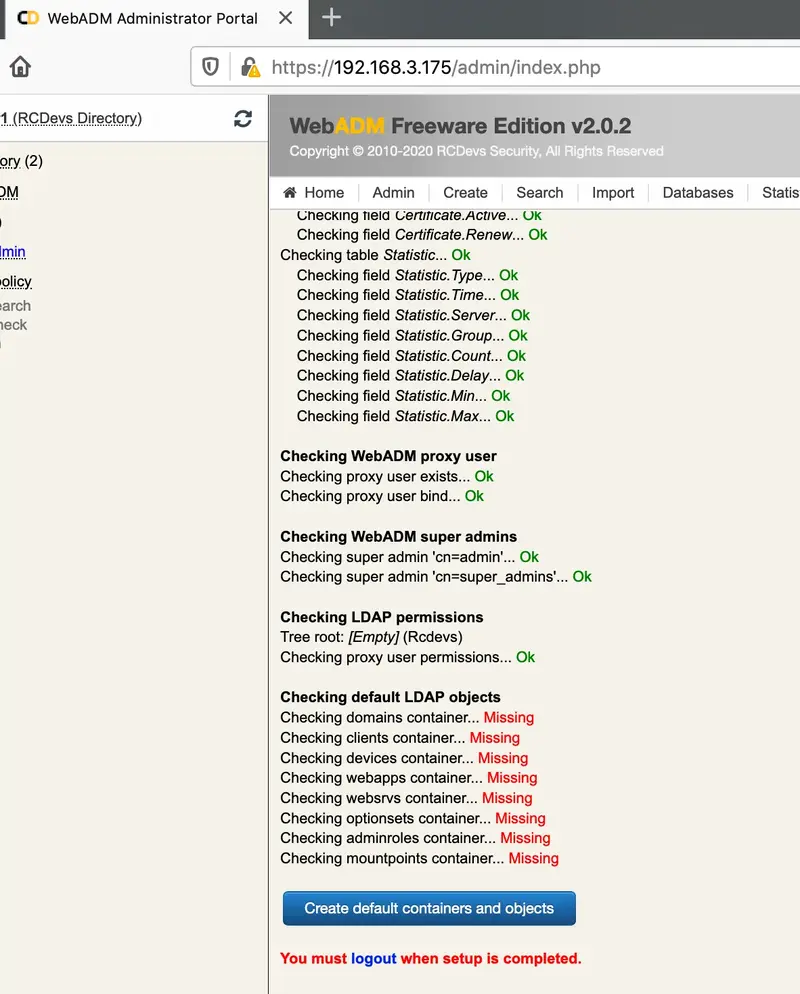
After login, it will say your setup “is not completely configured”.
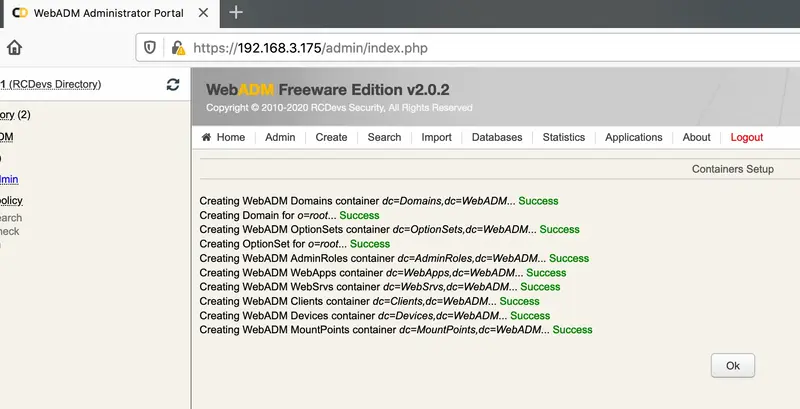
In order to finish that, click in created LDAP default containers and objects. Then logout and login again.
For the next login, you should only put admin as username.
License Note
If you see a message “No license slot error”, that means you already used the same email address to request another license. You can fix that by just clicking in the unbind button at the end of license details.
Offline licenses are based on IP addresses used by WebADM. If you are using Swarm, you may not be able to assign static IPs to your containers and then that kind of license can not be used.
9. WAProxy configuration
In the WAProxy container, we will only need to set the WebADM IP. Edit the file waproxy.conf.
[root@mdcos ~]# vi /var/lib/docker/volumes/waproxy_conf/_data/waproxy.conf
In server_addr1 set the WebADM IP or hostname. In case you have WebADM cluster, you can set multiple IPs.
interface 0.0.0.0

port_std 80

port_ssl 443

server_addr1 webadm1
###server_addr2 webadm2

server_policy Ordered

ssl_protocol TLSv1.2

access_log No
For a full WAProxy configuration explanation, you can check this article.
We also need to configure WebADM to accept our WAProxy server. To do that, edit the webadm.conf file:
[root@mdcos ~]# vi /var/lib/docker/volumes/webadm1_conf/_data/webadm.conf
Edit the parameters waproxy_waproxies with the container internal address and the waproxy_pubaddr with container external address.
In our example, we can use the container hostname for internal access. WAProxy external address is set to 192.168.3.176.
# Enable this setting ONLY if you are using RCDevs WAProxy as reverse-proxy!
waproxy_proxies "waproxy"
# The public DNS name of your WAProxy server
waproxy_pubaddr "192.168.3.176"
Finally, restart WebADM and WAProxy to apply the configuration.
[root@mdcos ~]# docker restart webadm1
[root@mdcos ~]# docker restart waproxy
To make sure all applications are running, you can check container status and logs by executing the following commands:
[root@mdcos ~]# docker ps -a
[root@mdcos ~]# docker logs container_name