MFAVPN VMWare Appliance
RCDevs MFAVPN Virtual Appliance Startup Guide
The RCDevs MFAVPN VMware Appliance is a minimal CentOS 8 (64Bit) Linux installation with the RCDevs software packages already installed with yum.
The appliance is meant for rapid deployment of VPN solution with Multifactor authentication. In longer term production deployments, we strongly recommend separating the MFAVPN component to a dedicated server for improved security. This can be done without downtime after initial deployment is done using the all in one appliance.
If you already have an existing OpenOTP server, or wish deploy the MFA VPN Server and OpenOTP Server on separate servers, you should not use this appliance. In this case follow the installation documents for WebADM/OpenOTP Virtual Appliance and MFA VPN.
The Appliance contains the following preconfigured components:
- WebADM Server (installed in /opt/webadm/).
- WebADM Web Services: OpenOTP, SMSHub, OpenSSO, SpanKey, TiQR (installed in /opt/webadm/websrvs/).
- WebADM WebApps: SelfDesk, SelfReg, PwReset, OpenID (installed in /opt/webadm/webapps/).
- MFA VPN Server
- OpenOTP Radius Bridge (installed in /opt/radiusd/).
- RCDevs Directory Server (OpenLDAP in /opt/slapd/).
- MySQL Database Server (MariaDB).
- Postfix local Mail Transfer Agent.
To use the RCDevs VMware appliance, proceed as follows:
1. Download and Start the Appliance
Go to RCDevs Website to download the Appliance ZIP archive. The Appliance is provided in both VMX and OVF formats. The appliance is compatible with VMware ESX, ESXi, Workstation and Oracle VirtualBox. Unzip the archive and in VMware and choose Import Appliance. Select the VMX or OVF file.
Important
Do not copy and run the appliance directly without importing because the Appliance will fail during the boot process with a read-only filesystem error.
If required, you can adjust the CPU and memory settings of your Appliance. By default, it is configured with virtual 2 CPUs and 2GB memory.
In case you choose to use the VMX import format (and not the preferred OVF format), you will need to set up the VM system by yourself and use the VMX as SCSI storage file. The following configuration information may be useful:
- System type: Linux 64Bit (2 CPUs and 2Go RAM)
- Disk controller: SCSI LsiLogic
- Drive: the VMX file is a dynamically allocated 20 Go drive
- Network: PCnet-FAST III (Am79C973) card
Keep the boot console opened during the boot process to track any startup error. The Appliance is configured to get its IP address via DHCP.
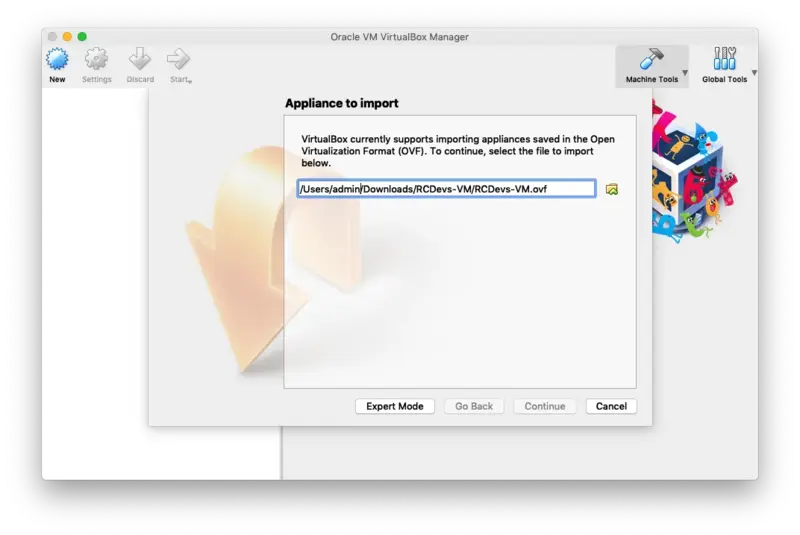
2. VirtualBox Import
In the VirtualBox Menu click on File then Import Appliance. Now select the RCDevs Virtual Appliance File RCDevs-VM.ovf to import and click on Continue.
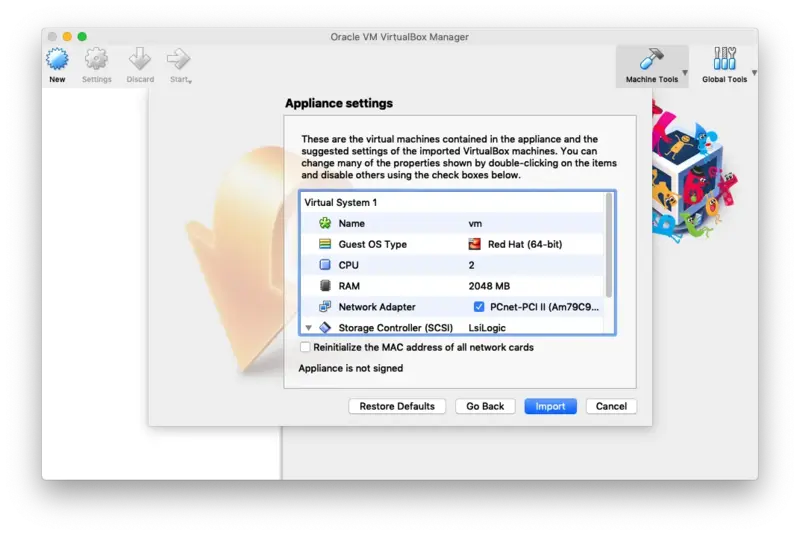
Now click on Import.
The guest operating system 'rhel7_64Guest' is not supported
If you encountered this kind of message during the RCDevs VM import, then you have to adjust the compatibility mode according to your ESXi, Workstation, Fusion or Player version. Have a look at the VMWare website to have more information about virtual hardware versions supported according to your VMWare version. To change the hardware version on the VM, have a look at the VM settings > Compatibility mode and change the hardware version with one supported by your VMWare software.
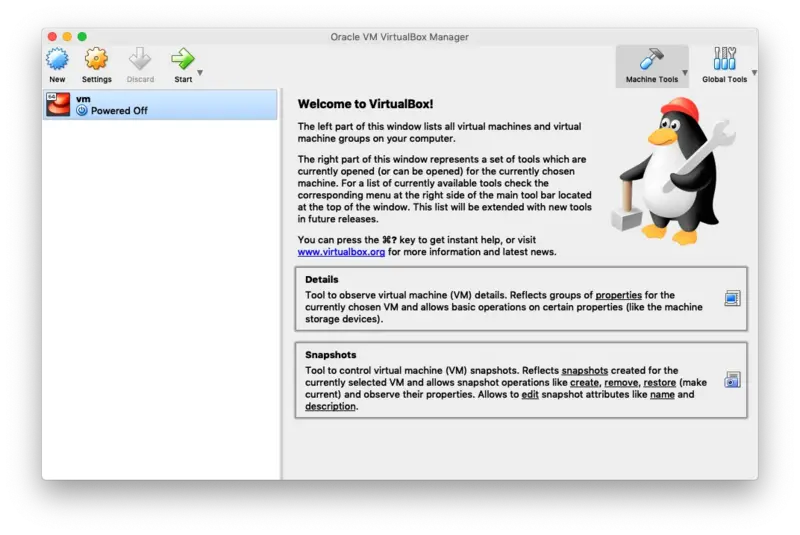
Finally, click on Start to boot the RCDevs Virtual Appliance.
3. Start the Setup Script
This script occurs only once (at first boot) and does not require a login password.
You can open the console or access with ssh to do the setup at first boot.
You can restart it with vm_init command.
The WebADM setup script asks for minimal details required for the setup:
- Your time zone.
- IP address, gateway and DNS address, or optionally accept DHCP settings.
After this short setup is completed, the script will start all the services:
- WebADM HTTP, SOAP, PKI and Session Manager Services.
- Radius Bridge Service
- LDAP Server
- SQL Server
- MFAVPN Server
3.1 Setup
-------------------------------------------------------------------------
Welcome to RCDevs VMWare Appliance 1.7.10!
-------------------------------------------------------------------------

Please identify a location so that time zone rules can be set correctly.
Please select a continent or ocean.
 1) Africa
 2) Americas
 3) Antarctica
 4) Arctic Ocean
 5) Asia
 6) Atlantic Ocean
 7) Australia
 8) Europe
 9) Indian Ocean
10) Pacific Ocean
11) none - I want to specify the time zone using the Posix TZ format.
#? 8
Please select a country.
 1) Albania		  18) Guernsey		    35) Poland
 2) Andorra		  19) Hungary		    36) Portugal
 3) Austria		  20) Ireland		    37) Romania
 4) Belarus		  21) Isle of Man	    38) Russia
 5) Belgium		  22) Italy		    39) San Marino
 6) Bosnia & Herzegovina  23) Jersey		    40) Serbia
 7) Britain (UK)	  24) Latvia		    41) Slovakia
 8) Bulgaria		  25) Liechtenstein	    42) Slovenia
 9) Croatia		  26) Lithuania		    43) Spain
10) Czech Republic	  27) Luxembourg	    44) Sweden
11) Denmark		  28) Malta		    45) Switzerland
12) Estonia		  29) Moldova		    46) Turkey
13) Finland		  30) Monaco		    47) Ukraine
14) France		  31) Montenegro	    48) Vatican City
15) Germany		  32) Netherlands	    49) Åland Islands
16) Gibraltar		  33) North Macedonia
17) Greece		  34) Norway
#? 27

The following information has been given:

	Luxembourg

Therefore TZ='Europe/Luxembourg' will be used.
Local time is now:	Fri Mar 20 17:15:12 CET 2020.
Universal Time is now:	Fri Mar 20 16:15:12 UTC 2020.
All following options are set with the default value in square brackets. You can keep it by pressing enter.
This VM is running with dynamic IP assignment (DHCP)
The current IP address is 192.168.0.159
Do you want to configure a static IP ([y]/n)? y
Please type the fixed IP address [192.168.0.159]: 192.168.0.200
Please type the network mask [255.255.255.0]:
255.255.255.0
Please type the gateway address [192.168.0.1]: 192.168.0.1
Please type your primary DNS server IP [8.8.8.8]: 192.168.0.1
Please type your secondary DNS server IP []: 1.1.1.1

Fixed IP address: 192.168.0.200
Network address: 192.168.0.0
Network mask: 255.255.255.0
Gateway IP address: 192.168.0.1
Primary DNS server: 192.168.0.1
Secondary DNS server: 1.1.1.1
Do you confirm ([y]/n): y
Writing /etc/sysconfig/network-scripts/ifcfg-enp0s17
Restarting network...
Checking system architecture...Ok
Generating CA private key... Ok
Creating CA certificate... Ok
Generating SSL private key... Ok
Creating SSL certificate request... Ok
Signing SSL certificate with CA... Ok
Adding CA certificate to the local trust list... Ok
Setting file permissions... Ok
Adding systemd service... Ok
Adding logrotate scripts... Ok
Generating secret key string... Ok
WebADM has successfully been setup.
    Primary OpenOTP service URL is: 'https://localhost:8443/openotp/'
    Secondary OpenOTP service URL is: 'NONE'
    Register MFA VPN Server logrotate script: 'YES'
    MFA VPN Server must be automatically started at boot: 'YES'

Applying MFA VPN Server settings from default configuration files... Ok
Generating diffie-hellman key file for daemon 'openvpn'...
WARNING: can't open config file: /opt/mfavpn/lib/openssl.cnf
Generating DH parameters, 2048 bit long safe prime, generator 2
This is going to take a long time
...............................................................................................+...........................................+.....................................................................................++*++*++*++*
 Ok
Generating ta.key (tls-auth) file for daemon 'openvpn'... Ok
Retrieving WebADM CA certificate from host 'localhost'... Ok
The setup needs now to request a signed 'openvpn' server certificate.
This request should show up as pending in your WebADM interface and an administrator must accept it.
Waiting for approbation... Ok
Updating entry 'client_id' in file '/opt/mfavpn/conf/ovpnauthd.conf'... Ok
Registering MFA VPN Server service...
Registering MFA VPN Server service... Ok
Adding logrotate script... Ok

MFA VPN Server has successfully been setup.

updating: client/ (stored 0%)
updating: client/ca.crt (deflated 25%)
updating: client/ta.key (deflated 39%)
updating: client/client.ovpn (deflated 55%)

You can connect your server via SSH with 'ssh root@192.168.0.200'.
SSH root password is 'password'.

You can login RCDevs WebADM Admin Portal at 'https://192.168.0.200'.
WebADM login username is 'admin'.
WebADM login password is 'password'.

WARNING: This appliance is configured with permissive firewall,
dummy certificates, default passwords for services and root access.
You MUST re-configure your appliance before any production use!

Press any key to finish!
We are now ready to use WebADM.
Have a look at the following documentation to register a token and perform an authentication.
3.2 Test User Authentication
Now, it’s time to test your OpenOTP installation by enrolling a Software Token and test a user authentication. Please, follow this documentation OpenOTP Quick Start. If you don’t have a Hardware Token to register then you need to install the OpenOTP Token Mobile Application (Software Token) for the smartphone. Please, read this documentation OpenOTP Token Mobile Application.
4. Resetting the Appliance
At any moment, you can reset the VMware appliance to its original state by running the vm_reset command from the shell (for example if we want to restart the initial setup). You can also re-run the initial setup script by using the vm_init command. Be aware that re-running the vm_reset or vm_init script will remove any work data in the VM.
You can find the WebADM setup script in /opt/webadm/bin/ and the Radius Bridge setup script in /opt/radiusd/bin/. With the RCDevs Directory Server version, you can find the OpenLDAP setup script in /opt/slapd/bin/.
Please look at the INSTALL and README files in /opt/webadm/, /opt/radiusd/ and /opt/slapd/.
Thanks for trying RCDevs Security solutions.
5. Upgrade the Appliance
To upgrade the RCDevs appliance, you just need to perform the following command:
yum update
Every RCDevs packages and others installed on the RCDevs appliance will be updated. A restart may be required.
6. Testing your OpenOTP Installation
This appliance is configured for Login Mode = OTP as default. This means in authentications only OTP password is required and LDAP password is not asked.
First, login to the WebADM Administration interface with you browser in the IP address configured in step 3.1
The default admin password is password. You should change by selecting the admin user from the left side panel, and then selecting Change Password under LDAP Actions.
6.1 Enroll a Software Token
Your OpenOTP Server is now working and you can start enrolling a test user. We will enroll a Software Token for a new user with Google Authenticator.
-
On your iPhone or Android phone, go to the AppStore and search for Google Authenticator. Download and install the application on your mobile.
-
Create a WebADM Account test user in your LDAP tree. Go to the top menu in WebADM, and click the
Createbutton. Choose theWebADM Accountobject and create a user with login name ‘testing’ and password ‘test’. Alternatively, you can use an existing WebADM user for your tests. Set the Container (LDAP folder) to a location below you Domain User Search Base.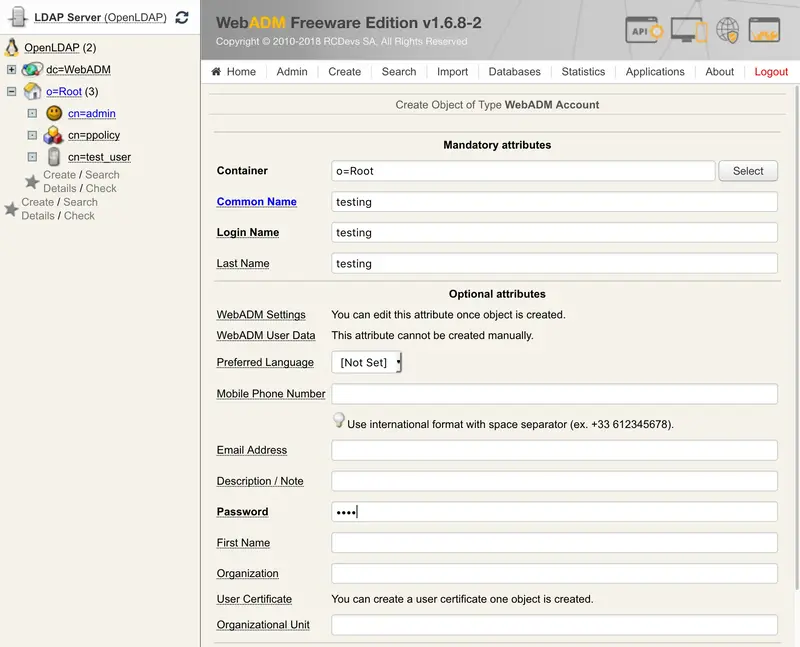
-
Once the user is created, select it on the left side panel and click the
MFA Authentication Serverbutton in the Application Actions box.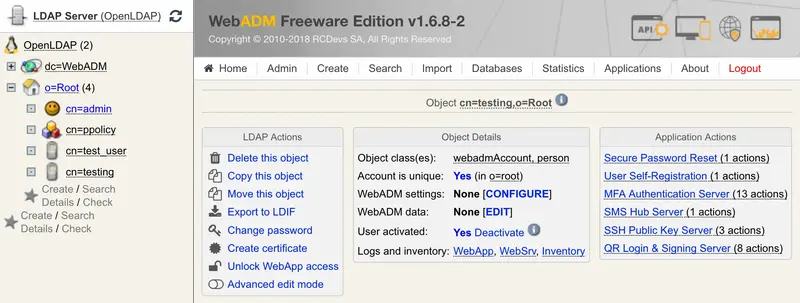
-
Click the
Register / Unregister Tokenbutton.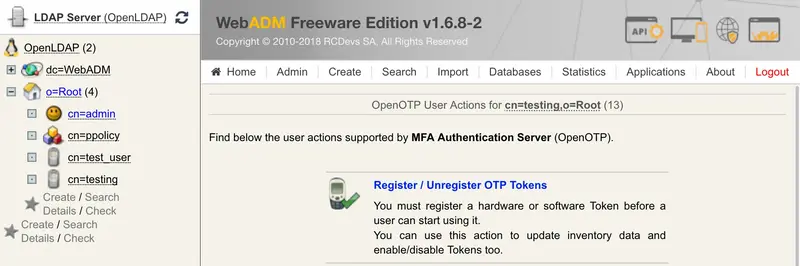
-
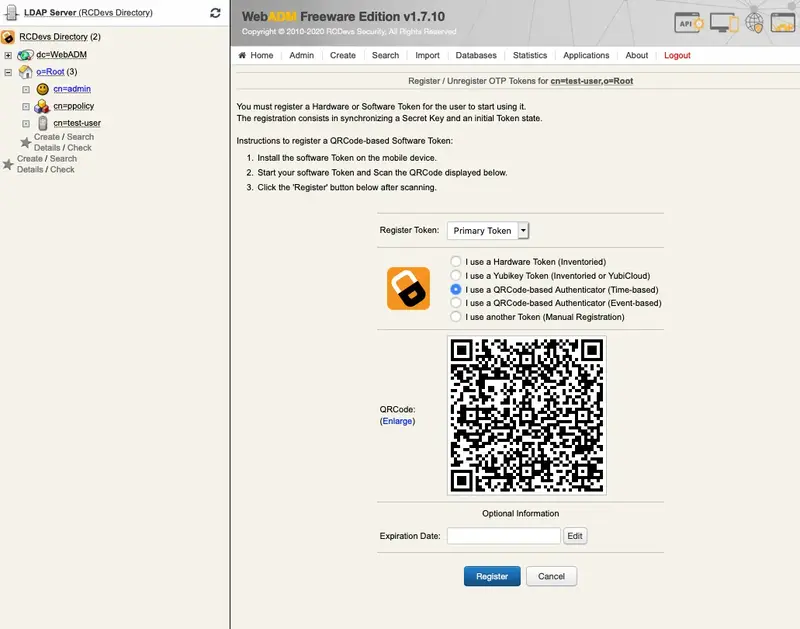
Check the Google Authenticator Time-based or Event-based checkbox. Immediately, a QRCode is displayed on the page.
-
Start the OpenOTP Token or Google Authenticator application on your mobile phone and click the
Camerabutton. Scan the QRCode to register a new Software Token on your mobile phone. When done, click theRegisterbutton on the screen. The Software Token is now registered in OpenOTP.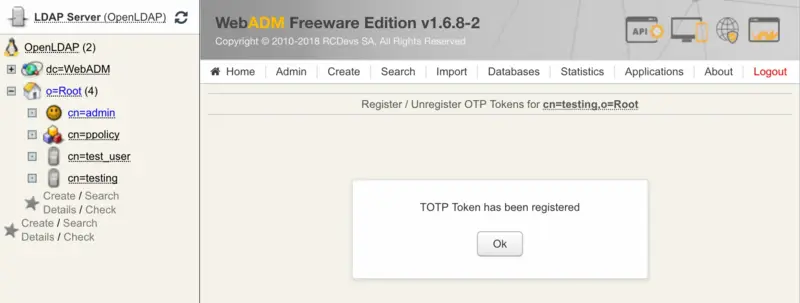
6.2 Test User Authentication
-
Return to the
MFA Authentication Serverin the Application Actions box for the user and click theTest User Authenticationaction.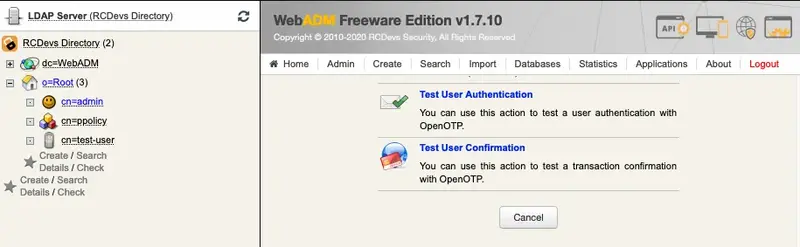
A login form is displayed. Enter the OTP from the mobile in the Password field and let the rest empty. Click the
Startbutton.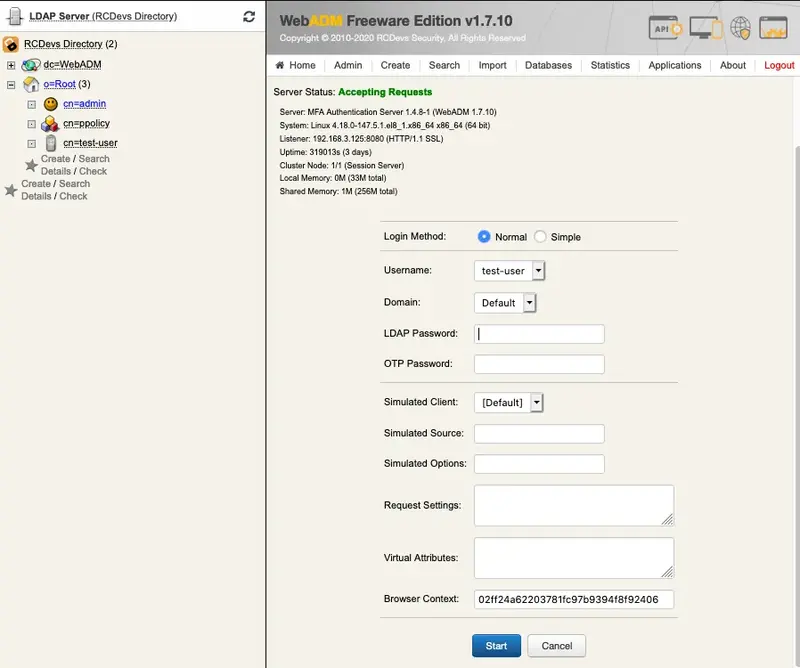
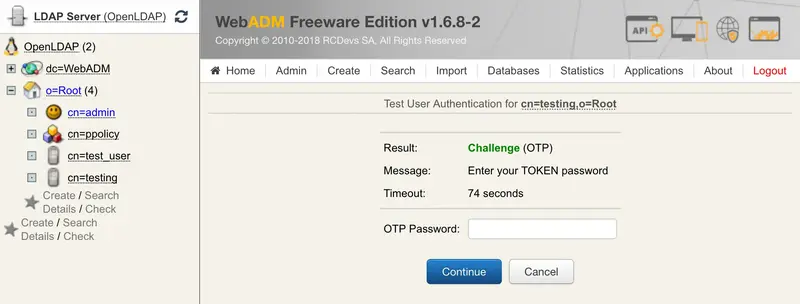
-
You didn’t enter the OTP in the login and OpenOTP also activates the Challenged-OTP mode. A new window is displayed with a message asking for your Token password. Enter the password displayed on your Google Authenticator mobile application.
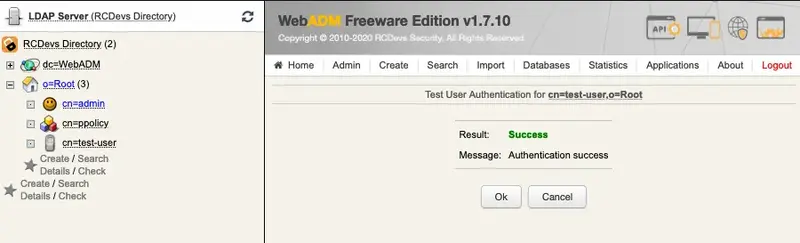
-
WebADM displays the authentication result and server message.
You can have a look at the ‘WebADM Server Log Files’ in the ‘Database’ menu to see what happened.
[2020-03-23 09:49:47] [192.168.3.125] [OpenOTP:P8AO2KNZ] New openotpNormalLogin SOAP request
[2020-03-23 09:49:47] [192.168.3.125] [OpenOTP:P8AO2KNZ] > Username: test-user
[2020-03-23 09:49:47] [192.168.3.125] [OpenOTP:P8AO2KNZ] > Domain: Default
[2020-03-23 09:49:47] [192.168.3.125] [OpenOTP:P8AO2KNZ] > Client ID: OpenOTP
[2020-03-23 09:49:47] [192.168.3.125] [OpenOTP:P8AO2KNZ] > Source IP: 192.168.3.125
[2020-03-23 09:49:47] [192.168.3.125] [OpenOTP:P8AO2KNZ] > Context ID: 1b52001d3be38ba6d5e5532b4ce61df0
[2020-03-23 09:49:47] [192.168.3.125] [OpenOTP:P8AO2KNZ] Registered openotpNormalLogin request
[2020-03-23 09:49:47] [192.168.3.125] [OpenOTP:P8AO2KNZ] Resolved LDAP user: cn=test-user,o=Root
[2020-03-23 09:49:47] [192.168.3.125] [OpenOTP:P8AO2KNZ] Started transaction lock for user
[2020-03-23 09:49:47] [192.168.3.125] [OpenOTP:P8AO2KNZ] Found user fullname: test-user
[2020-03-23 09:49:47] [192.168.3.125] [OpenOTP:P8AO2KNZ] Found 46 user settings: LoginMode=OTP,OTPType=TOKEN,ChallengeMode=Yes,ChallengeTimeout=90,OTPLength=6,MobileTimeout=30,EnableLogin=Yes,HOTPLookAheadWindow=25,TOTPTimeStep=30,TOTPTimeOffsetWindow=120,OCRASuite=OCRA-1:HOTP-SHA1-6:QN06-T1M,DeviceType=FIDO2,SMSType=Normal,SMSMode=Ondemand,MailMode=Ondemand,PrefetchExpire=10,LastOTPTime=300,ListChallengeMode=ShowID
[2020-03-23 09:49:47] [192.168.3.125] [OpenOTP:P8AO2KNZ] Found 3 user data: TokenType,TokenKey,TokenState
[2020-03-23 09:49:47] [192.168.3.125] [OpenOTP:P8AO2KNZ] Found 1 registered OTP token (TOTP)
[2020-03-23 09:49:47] [192.168.3.125] [OpenOTP:P8AO2KNZ] Requested login factors: OTP
[2020-03-23 09:49:47] [192.168.3.125] [OpenOTP:P8AO2KNZ] Authentication challenge required
[2020-03-23 09:49:47] [192.168.3.125] [OpenOTP:P8AO2KNZ] Started OTP authentication session of ID Erc5Pn2jpTSA7Xj9 valid for 90 seconds
[2020-03-23 09:49:47] [192.168.3.125] [OpenOTP:P8AO2KNZ] Sent login challenge response
[2020-03-23 09:50:05] [192.168.3.125] [OpenOTP:P8AO2KNZ] New openotpChallenge SOAP request
[2020-03-23 09:50:05] [192.168.3.125] [OpenOTP:P8AO2KNZ] > Username: test-user
[2020-03-23 09:50:05] [192.168.3.125] [OpenOTP:P8AO2KNZ] > Domain: Default
[2020-03-23 09:50:05] [192.168.3.125] [OpenOTP:P8AO2KNZ] > Session: Erc5Pn2jpTSA7Xj9
[2020-03-23 09:50:05] [192.168.3.125] [OpenOTP:P8AO2KNZ] > OTP Password: xxxxxx
[2020-03-23 09:50:05] [192.168.3.125] [OpenOTP:P8AO2KNZ] Registered openotpChallenge request
[2020-03-23 09:50:05] [192.168.3.125] [OpenOTP:P8AO2KNZ] Found authentication session started 2020-03-23 09:49:47
[2020-03-23 09:50:05] [192.168.3.125] [OpenOTP:P8AO2KNZ] Started transaction lock for user
[2020-03-23 09:50:05] [192.168.3.125] [OpenOTP:P8AO2KNZ] TOTP password Ok (token #1)
[2020-03-23 09:50:05] [192.168.3.125] [OpenOTP:P8AO2KNZ] Updated user data
[2020-03-23 09:50:05] [192.168.3.125] [OpenOTP:P8AO2KNZ] Sent login success response
7. Create a VPN Client Profile and test connection
You can find a OpenVPN compatible client profile package in the appliance in /root/client.zip You can copy that to the client machine or create a new one.
The profile has two important components:
- OpenVPN profile file (.ovpn)
- CA Certificate of the server
You can use any OpenVPN compatible VPN client. For instructions how to import the configuration to a VPN client, please see this document.
7.1 OpenVPN profile file
Here is a sample OpenVPN profile file, please edit it to correspond with your settings. The only setting you must change is the remote address of the VPN Server.
##############################################
# Sample client-side OpenVPN 2.0 config file #
# for connecting to multi-client server.     #
#                                            #
# This configuration can be used by multiple #
# clients, however each client should have   #
# its own cert and key files.                #
#                                            #
# On Windows, you might want to rename this  #
# file so it has a .ovpn extension           #
##############################################

# Specify that we are a client and that we
# will be pulling certain config file directives
# from the server.
client

# Use the same setting as you are using on
# the server.
# On most systems, the VPN will not function
# unless you partially or fully disable
# the firewall for the TUN/TAP interface.
dev tun

# Windows needs the TAP-Win32 adapter name
# from the Network Connections panel
# if you have more than one.  On XP SP2,
# you may need to disable the firewall
# for the TAP adapter.
;dev-node MyTap

proto udp

# The hostname/IP and port of the server.
# You can have multiple remote entries
# to load balance between the servers.
#
# Replace mfavpn.rcdevs.local with your
# public IP or DNS name

remote mfavpn.rcdevs.local 1194

# Keep trying indefinitely to resolve the
# host name of the OpenVPN server.  Very useful
# on machines which are not permanently connected
# to the internet such as laptops.
resolv-retry infinite

# Most clients don't need to bind to
# a specific local port number.
nobind

# Downgrade privileges after initialization (non-Windows only)
user nobody
group nobody

# Try to preserve some state across restarts.
persist-key
persist-tun

# If you are connecting through an
# HTTP proxy to reach the actual OpenVPN
# server, put the proxy server/IP and
# port number here.  See the man page
# if your proxy server requires
# authentication.
;http-proxy-retry # retry on connection failures
;http-proxy [proxy server] [proxy port #]

# Wireless networks often produce a lot
# of duplicate packets.  Set this flag
# to silence duplicate packet warnings.
;mute-replay-warnings

# SSL/TLS parms.
# See the server config file for more
# description.  It's best to use
# a separate .crt/.key file pair
# for each client.  A single ca
# file can be used for all clients.
ca ca.crt

# Select a cryptographic cipher.
# If the cipher option is used on the server
# then you must also specify it here.
cipher AES-256-CBC


# Set log file verbosity.
verb 3

auth-user-pass
auth-retry interact
auth-nocache
reneg-sec 600
7.2 CA Certificate file
It is critical that you configure the WebADM CA certificate to the VPN clients to prevent a man-in-the-middle attacks. It is included in the client configuration package, or you can download this file from https://WEBADM_IP/cacert
8. Access from external network
For VPN access from external network, like the Internet, the MFAVPN appliance must be reachable. The communication is on the standard OpenVPN port (1194/UDP). Please ensure that you have the required port forwarding and firewall rules in place.
The MFAVPN appliance is configured for IP forwarding and it will masquerade the VPN traffic behind it’s own IP. This is in order to enable easy connectivity without need to configure routes to the VPN network. If you wish to change this configuration, please refer to FirewallD documentation.
Appendix A - Further documentation
Please, refer to the following documents for more detailed instructions: